Hew's Steel Buckler Project

This is for SCA Rapier Combat ("Rigid Parrying Object") This was my first ever armouring-type project. and it involved dishing steel plate, and rolling an edge around a flat curve.

- 18 gauge cold-rolled steel 34 cm (13.4") diameter, with a 33 mm (1.3") deep umbo.

These pictures were taken long after I had made it and had been using it, so I don't have any photos from the early stages of construction. One day I decided to remove the handle and planish the umbo (the bowl-like part in the middle).

Planishing is the process of smoothing out bumps in metal plate by hammering it lightly on the "good" side with a (usually) hard smooth surface under it, like a mushroom stake. It's also the name for a similar process that tinsmiths used to hammer out rolled sheets into flat sheets. The surface becomes a lot of small facets. If you've seen "hammertone" or "gunmetal" textured paint, this is the effect it's supposed to emulate.


(click for enlargement in new window)

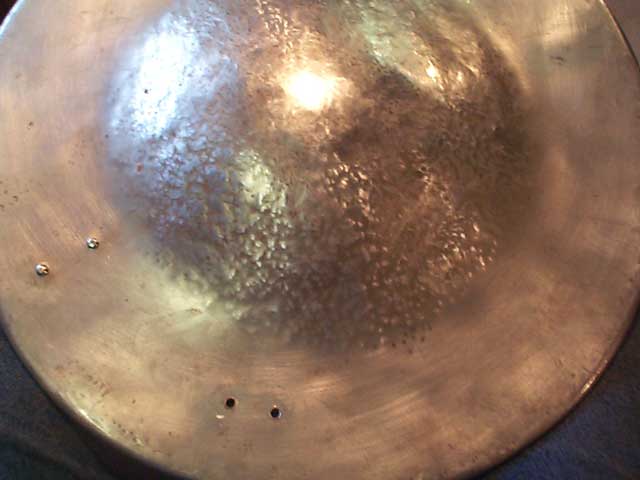
Already dished and edges rolled, handle has been removed, but just started planishing.

See the many bumps in the middle. That's what I get for using an un-modified ball-peen hammer to dish it. Even a hammer ground down for dishing will give bumps, but they're more round and smooth. The round end of an off-the-shelf ball peen hammer is too pointy.

The colours you see are an artifact of the mix of tungsten, fluorescent, and natural lighting


(click for enlargement in new window)

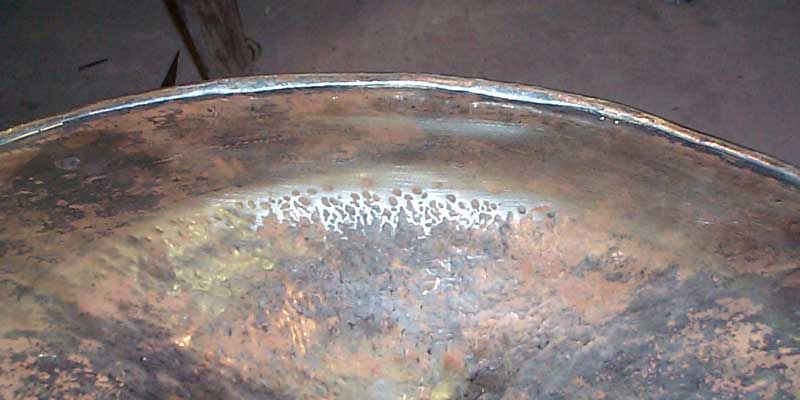
Inside, showing the rolled edge that I should have ground off evenly before closing it. Notice the gaps. When I cut out the circle, I used an electric shear. It was fast, but somewhat hard to control on curves, so it wasn't perfectly circular. When I had gotten as far as raising the rim to vertical (like a very shallow cake pan), what I should have done to fix it was to grind the top edge such that it was the same height all the way around. I didn't.

I cheated in the rolling by using a coathanger wire inside the roll, to help keep it from flattening and to keep a more-or-less consistent radius in the roll. One coathanger gave me just enough to make it around, with only 3 or 4 inches left over. I say "cheated" because one source maintains that armourers (in Period) did not use a wire core in rolled edges, and that surviving examples with wire cores are the result of repairs made in relatively recent times. The diameter of the roll is something like 5 mm (3/16")

Many rusty spots, probably from "Small Brawl At Summer's End" 2004.

The belt clip.

This was added a few months after I had been usinf the buckler. It's made from a scrap of some kind of coated steel, possibly 16 gauge or thicker.

This had me puzzled for a while - rivet first, or bend first? I ended up bending it first, but left enough room to insert the rivet which were already cut to length. At the same time I flared the ends of the 180 degree bend towards the rim so that the edges of the clip would not cut into any belt it hangs from.

These rivets were just some 2 1/4" common nails.

I put a thick steel bar in between the two legs of the clip, flipped it over, and supported the ends of the bar with two other thick pieces of aluminum or something while I peened the rivets from the front.


(picture forthcoming, some day)

(going back in time, to when I first made the buckler)

I cut out the handle as a rectangle, then cut two notches from each of the four corners. I had previously made a mockup in posterboard and masking tape to get an idea of how wide to cut it. Then I folded the outside 6 mm (1/4") of the two long edges. That way, I end up with two folded edges meeting in the middle instead of raw edges. I don't know if that was worthwhile, but it seemed to be a good idea at the time. I think I had the notion that there was less possibility of pinching the glove.

I started the curve by clamping one long edge in a bench vise alongside a 1" pipe, and beating the rest over the pipe. Flip edges, and repeat. I took the 1/3 cylinder and pinched the edges in the vise, until it was a 1/2 cylinder (like a rain gutter). Next I rotated it by about 30 degrees, and squeezed one edge part way towards the curl opposite it. Rotate about 30 degrees the other way, and squeeze.

Eventually, I got a 3/4 cylinder and alternated between squeezing it with the two edges on the same jaw of the vise, and squeezing with both edges facing up, until the gap between the folded edges closed. The big trick was to avoid making the cross-section like a cardiod (heart shape, with rounded point) and end up with an oval cross-section.

Finally, I beat the ends flat with a hammer, while periodically checking to see how closely it followed the curve at the edge of the umbo, on the back of the buckler. Remember the notches I had cut out? These are at the ends where I didn't need to fold the edges.

To locate the rivet holes, I taped the handle to the back with one edge of the handle over the centerline across the buckler. I took a marker and, by running my pinkie knuckle along the edge of the buckler while holding a marking pen, marked across the ends of the handle with lines that followed the curve of the buckler edge. I wanted an off-centre handle. Just to pretty it up a bit, I cut and filed the handle ends so that they too were curved and parallel to the buckler edge. The rivet holes are all some equal distance from their nearest long edge. I outlined the ends of the handle so I could find the location again, drilled the four rivet holes, and taped it back onto the buckler again. Then I marked around the inside of the handle's rivet holes on the buckler back, and drilled out those holes.


Hew's Medieval Stuff - up two levels

Hew's Armoury Stuff - up one level