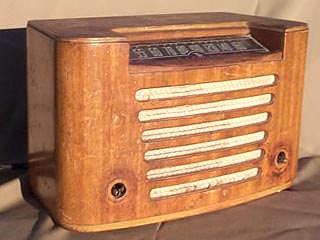
Viking EMU51-418
made ca. 1948 in Kitchener, Ontario, by Dominion Electrohome
(photo before restoration)
|
|
This is my first wooden cabinet model. I found it at "Cindy's Junk Shop" in Moncton, New Brunswick, Canada. I just had to go there, because she was having a 50% off store-wide sale. This one was marked down from Cdn$60.00 to $30.00.
One of the members of the Antique Radios Online Forum members was kind enough to email me a schematic for it. I'm still looking for a picture with the original knobs. It was manufactured by Dominion Electrohome for the T. Eaton department store chain. Viking was their house brand for appliances of all types, from radios to refrigerators. I say "was" because after 130 years in operation, Eaton's filed for bankruptcy last year, and most of the assets were bought out by Sears Canada. That's pretty much the end of one old rivalry.
More photos added September 27, 2000:
|
The reverse-painted glass dial was in great shape, once I got it out and wiped it off. The finish on the top is stained and scuffed, right down to bare wood in places. |
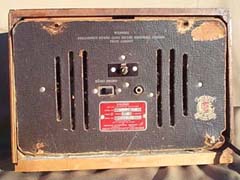
The back is a bit chewed up. I think it was always nailed on, at the bottom. See wooden standoffs, below on this page. |
|
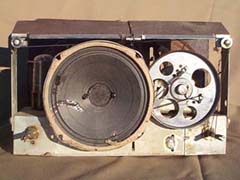
Good news - the dial string was intact. The first thing I did was sketch out how the string went. As it turns out, the dial stringing diagram is on the schematic. |
Chassis top - Lots of dust bunnies, a missing 50L6-GT tube, and a really decrepit power cord. After replacing the cord and adding the tube, and putting on some temporary knobs, it worked! |
|
Chassis bottom - When I first looked at the chassis, I wondered what caused the bends in the front. I soon realised that it was supposed to go that way, because the cabinet is curved in front. Here you can see the square wooden standoffs that the back is nailed to. The big yellow filter capacitor looks like it has already been replaced long ago, and the repairman merely clipped the leads off the old cap and soldered the new cap's leads onto the ends of the old one. Tsk-tsk. |
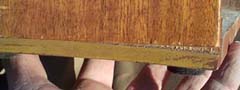
The bottom solid piece of wood has warped a bit, resulting in some small gaps at the bottom back corners. A bit of clamping and gluing should fix it. Note the opaque greenish-beige paint along the bottom edge. |
Since I could not find any nitrocellulose lacquer in any of the likely places nearby, I've decided to use a polyurethane clear gloss finish. After all, it may be that it did not have nitrocellulose lacquer in first place. When I asked for nitrocellulose lacquer at any of the local places, I just got this blank look and they waved in the direction of the polyurethane and acrylic stains and finishes. Time to place an order with Antique Electronic Supply Online I suppose.
The other departure was with the greenish-beige paint that covered the edges of the bottom board and the edge of the top panel. I'm going to use a "Red Mahogany" stain, from Minwax. I figure this will sort of pick up the colour of the reddish-brown reverse paint across the bottom of the tuning dial. If I change my mind, I can always cover it with an opaque paint, like it originally had.
 October 24/2000 - I did some sanding
(#220, #320) and gave it one coat of 50% paint thinner and 50% clear gloss
polyurethane, just to protect the wood from stains and marks from handling.
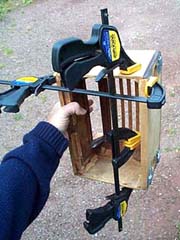
In this photo, one end is glued and clamped. By the time I had finished the
stripping (two applications) the back bottom corners had sprung out about
half an inch. The glue was Home Hardware's house brand, "Carpenter's
Glue". I had to do one side at a time because I didn't have enough clamps
to do both. Note the clever use of two shorter clamps to reach across the
back. These shorter ones were about a quarter inch too short (aaargh!) to
reach from top to bottom, else I would have glued both sides at once.
October 24/2000 - I did some sanding
(#220, #320) and gave it one coat of 50% paint thinner and 50% clear gloss
polyurethane, just to protect the wood from stains and marks from handling.
In this photo, one end is glued and clamped. By the time I had finished the
stripping (two applications) the back bottom corners had sprung out about
half an inch. The glue was Home Hardware's house brand, "Carpenter's
Glue". I had to do one side at a time because I didn't have enough clamps
to do both. Note the clever use of two shorter clamps to reach across the
back. These shorter ones were about a quarter inch too short (aaargh!) to
reach from top to bottom, else I would have glued both sides at once.
The duct tape patches protected the felt pads on the bottom from the stripper.
Oops. I should have used some sort of sanding sealer before applying any finish. The pores in the wood keep showing up even after several coats with sanding in between. Now that it's January 2001, I've put it on the shelf, so that I don't fill the house with fumes.
I'm still unable to determine what the knobs looked like. I did manage to find a picture of one of these, but it was only on a microfilm of a newspaper advertisement (The Globe and Mail, December 12, 1948), and the image was too small and high-contrast to tell what the knobs looked like. Here's the description:
Viking Table-Top AC-DC Radio – Featuring a striking cabinet – wonderful tone – outstanding value. Gracefully styled in hard-rubbed[sic] veneers. Sensitive 5-tube circuit with extra filtering to minimize hum and ripple. Phonograph plug and switch on back for attaching separate record player. Approx. size 12 x 18 x 7" Walnut each 36.75
Back to John Rose's Vintage Radio Home